
Hello!
In this tutorial I will show you how to create the following:
- Liferay Hook (using Liferay Hook Configuration)
- A custom Liferay Role using the Hook
- How to add permissions to the Liferay Role programmatically
Step 1:
- For the sake of this tutorial, I created a new Liferay Portlet (with Maven) called Test.
- Navigate in your project files and inside src/main/java create a new package (I named my package ro.ropardo.tutorial.hook)
- In this package we’ll create a new public class for the hook. The class will be called CreateRoleStartupAction and it will extend SimpleAction.
- Below you can see the project structure:
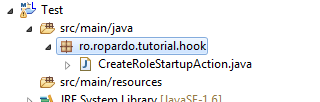
- And here is the new CreateRoleStartupAction class extending SimpleAction:
package ro.ropardo.tutorial.hook;

import com.liferay.portal.kernel.events.ActionException;
import com.liferay.portal.kernel.events.SimpleAction;

public class CreateRoleStartupAction extends SimpleAction {

	@Override
	public void run(String[] ids) throws ActionException {
		// TODO Auto-generated method stub
	}
}
Step 2:
- Next we’ll create the hook. Right click on your project and navigate like this:
→ New → Liferay Hook Configuration
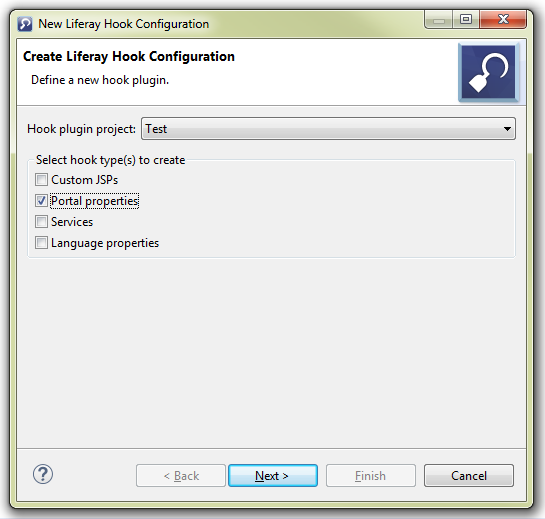
The following window will open. Select Portal properties and click Next.
The next part is a bit tricky. I will split it in smaller steps, so you don’t miss anything:
Step 2.1:
- First part is the Portal properties type. This is the path to the .properties file that will be used by the Hook. In this file you will tell the hook what to run and when to run it.
- The default path is /[project_name]/src/main/java/portal.properties
- This means that after you create the hook, a file called portal.properties will be created in src/main/java
- Change that path to the following structure:
/[project_name]/src/main/resources/[whatever_name].properties
- I find it better to save this kind of file in the resources folder. Saving it in /src/main/java might give some errors on deploy and there is no point complicating yourself.
Step 2.2:
- Next, we need to define the action that will be executed. Click Add…
- The event action window will open. See below:
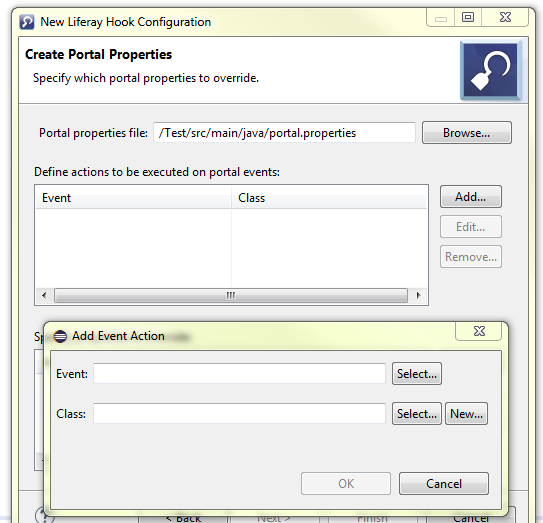
- For Event, click Select…
- From the Property selection select application.startup.events
- Next, back in the Add Event Action window, for Class, click on Select…
- In the Event Selection window search for CreateRoleStartupAction. The class we just created will appear. Select it.
- Now you have those two elements I told you about earlier: when (Event) and what (Class).
- Click OK for the Add Event Action and then Finish for the Hook.
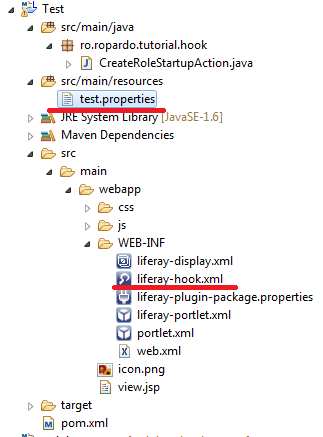
This is the project structure. The properties file can be seen in src/main/resources and the Liferay Hook was created in WEB-INF directory.
This is the test.properties file. It tells the Hook to run the CreateRoleStartupAction class on application startup (this means the class will be run by the hook when the Portlet will be deployed in the Liferay Portal).

Next, go to liferay-hook.xml in the WEB-INF folder. We need to check if it has the test.properties file attached. This is how it should look with the properties file:
![]()
Step 2.3 (optional):
- Next I will show you how to add it manually, in case it didn’t add automatically. You will have to go to the bottom of the file and navigate to Overview.

The Liferay Hook Configuration panel will open. Go to Portal Properties section and at Portal Properties File you will have to browse for your file and add it.
![]()
- After you added the file, go back to Source. The test.properties file will be automatically added in the code.
Step 3:
Now it’s time to add the methods in the CreateRoleStartupAction class.
1. First we have to complete the run method.
public void run(String[] ids) throws ActionException {
		long companyId = 0;

		try {
			for (String id : ids) {
				companyId = Long.parseLong(id);

				createSiteRole(companyId, "TEST", "Test",
					"This role was created with Hook.",
					RoleConstants.TYPE_REGULAR);
			}

		} catch (Exception e) {
			throw new RuntimeException(e);
		}
	}
2. Next, we add the create method.
private Role createSiteRole(long companyId, String roleName, String roleTitle,
String roleDescription, int roleType) throws PortalException {

		Role checkRole = null;
		Role newRole = null;

		try {
			LOG.info("Checking for "+ roleTitle + " Role...");
			checkRole = RoleLocalServiceUtil.fetchRole(companyId, roleName);
			if(checkRole == null) {
				LOG.info(roleTitle + " Role not found!");
				LOG.info("Creating "+ roleTitle + " Role...");

				Date now = new Date();
				Long userId = UserLocalServiceUtil.getDefaultUserId(companyId);
				Long roleClassNameId = ClassNameLocalServiceUtil
									.getClassNameId(Role.class);
				Long roleId = CounterLocalServiceUtil.increment();

				Role role = RoleLocalServiceUtil.createRole(roleId);
				role.setName(roleName);
				role.setTitle(roleTitle);
				role.setDescription(roleDescription);
				role.setType(roleType);
				role.setUserId(userId);
				role.setCompanyId(companyId);
				role.setClassNameId(roleClassNameId);
				role.setClassPK(roleId);
				role.setCreateDate(now);
				role.setModifiedDate(now);

				/* Add the new role */
				newRole = RoleLocalServiceUtil.addRole(role);

				/* Set permissions for document view */
				addRoleResourcePermissions(newRole);
			} else {
				LOG.info(roleTitle + " Role exists already.");
			}

		} catch(SystemException e) {
			LOG.debug("createSiteRole", e);
		}

		return newRole;
	}
3. In the last method, I set a few permissions for the Role. It’s about the View permissions for the Document Library. I saw many people trying to figure this one out and I thought I should include it in the Tutorial.
private void addRoleResourcePermissions(Role role)
throws PortalException, SystemException {

		LOG.info("Setting view documents permissions...");
		ResourcePermissionLocalServiceUtil.setResourcePermissions(
				CompanyThreadLocal.getCompanyId(),
				DLFolder.class.getName(),
				ResourceConstants.SCOPE_COMPANY,
				String.valueOf(CompanyThreadLocal.getCompanyId()),
				role.getRoleId(),
				new String[] {ActionKeys.VIEW});

		ResourcePermissionLocalServiceUtil.setResourcePermissions(
				CompanyThreadLocal.getCompanyId(),
				DLFileEntry.class.getName(),
				ResourceConstants.SCOPE_COMPANY,
				String.valueOf(CompanyThreadLocal.getCompanyId()),
				role.getRoleId(),
				new String[] {ActionKeys.VIEW});
	}
I used the setResourcePermissions from ResourcePermissionLocalServiceUtil class. The last parameter, as you can see, it’s an array made up of the permissions you can set. I only added VIEW. But you can also add more, such as DELETE, EDIT, etc. Simply put a comma after the VIEW one and add them using ActionKeys. Also for the Documents I used the classed DLFolder and DLFileEntry.
Basically if you want to set other permissions for completely different resources, you need to change the second parameter with the class name and the last with the type of permission(s).
Everything is done. Just deploy the Portlet and check the Roles section in Control Panel.
![]()
Good luck!
[…] /what-is-responsive-about/ /liferay-6-2-create-liferay-role-from-hook/ […]
March 7, 2016 at 3:36 pm