
Security in modern applications is paramount, and authentication mechanisms such as Keycloak play a vital role in securing API access. One critical aspect of authentication is validating access tokens, specifically, ensuring their integrity and authenticity through signature verification.
In this article, we walk through how to validate a Keycloak access token, using the JWT.io debugger for illustration. However, this approach can be leveraged with any tool or program capable of verifying JSON Web Tokens (JWTs).
Prerequisites
Before diving into Keycloak access token verification, ensure you have the following in place:
Keycloak Server Installation and Setup
- A running Keycloak instance (either local or remote).
- At least one realm created (e.g., master).
- A configured client (e.g., admin-cli) with the necessary authentication settings.
If you haven’t set up Keycloak yet, you can follow the official installation guide: Keycloak Documentation.
Required Software and Tools
Ensure you have the following tools installed on your machine:
- cURL – To interact with Keycloak’s token and certificate endpoints.
sh
sudo apt install curl # Linux
brew install curl # macOS
- jq – A lightweight JSON processor for parsing API responses.
sh
sudo apt install jq # Linux
brew install jq # macOS
- OpenSSL – To handle certificate conversion and token signature verification.
sh
sudo apt install openssl # Linux
brew install openssl # macOS
A User Account with Proper Permissions
- A Keycloak admin user with client credentials to request tokens.
- Alternatively, a standard user with username-password authentication
Network Configuration
- Ensure your Keycloak server is accessible from your local machine.
- If running Keycloak in a Docker container, expose the correct ports (e.g., 8080).
- Modify your Keycloak CORS settings if calling it from a frontend application.
Understanding JSON Web Tokens (JWTs)
Familiarity with JWT structure (header, payload, signature) will help in token validation. A useful resource is the JWT Introduction.
1. Obtaining an Access Token from Keycloak
The first step is retrieving an access token from the Keycloak authentication server using the token endpoint. You can achieve this via a simple cURL command:
sh
ACCESS_TOKEN=$(curl \
-d "client_id=admin-cli" \
-d "username=admin" \
-d "password=admin" \
-d "grant_type=password" \
"https://localhost:8080/auth/realms/master/protocol/openid-connect/token" | jq -r '.access_token')

echo $ACCESS_TOKEN
eyJhbGciOiJSUzI1NiIsInR5cCIgOiAiSldUIiwia2lkIiA6ICJBQ0dndHJObUpVNTVhMlZZSFpsbDZNTThsSEJPS2xXWHFGWXQ3ZmFTbWdNIn0.eyJleHAiOjE3MzgzMzEzOTEsImlhdCI6MTczODMzMTA5MSwianRpIjoiZmNlNzAwZGYtYjI1OC00MTVkLTk4Y2ItZjAxYTliMGQ5MTZhIiwiaXNzIjoiaHR0cHM6Ly9pYW0uY29tZm9ydGFnZS5uZXQvcmVhbG1zL0NvbWZvcnRhZ2UiLCJhdWQiOiJhY2NvdW50Iiwic3ViIjoiMzY5MjNkNjAtZTNmYy00OTBhLWI1MzAtYTQyYWY1ODY0Mjc5IiwidHlwIjoiQmVhcmVyIiwiYXpwIjoibW9iaWxlIiwic2Vzc2lvbl9zdGF0ZSI6IjNmNjQzMjljLTE5MzQtNDY5Ny1iYmQ0LTFiMTU4YjQ4YWJiNyIsImFjciI6IjEiLCJhbGxvd2VkLW9yaWdpbnMiOlsiLyoiXSwicmVhbG1fYWNjZXNzIjp7InJvbGVzIjpbImVuZHVzZXIiLCJkZWZhdWx0LXJvbGVzLWNvbWZvcnRhZ2UiLCJvZmZsaW5lX2FjY2VzcyIsInVtYV9hdXRob3JpemF0aW9uIl19LCJyZXNvdXJjZV9hY2Nlc3MiOnsiYWNjb3VudCI6eyJyb2xlcyI6WyJtYW5hZ2UtYWNjb3VudCIsIm1hbmFnZS1hY2NvdW50LWxpbmtzIiwidmlldy1wcm9maWxlIl19fSwic2NvcGUiOiJwcm9maWxlIGdyb3VwcyBtaW5pby1hdXRob3JpemF0aW9uIGVtYWlsIG9wZW5pZCIsInNpZCI6IjNmNjQzMjljLTE5MzQtNDY5Ny1iYmQ0LTFiMTU4YjQ4YWJiNyIsImVtYWlsX3ZlcmlmaWVkIjpmYWxzZSwibmFtZSI6IkwgQSIsImdyb3VwcyI6WyJlbmR1c2VyIiwiZGVmYXVsdC1yb2xlcy1jb21mb3J0YWdlIiwib2ZmbGluZV9hY2Nlc3MiLCJ1bWFfYXV0aG9yaXphdGlvbiJdLCJwcmVmZXJyZWRfdXNlcm5hbWUiOiJsYUBjb21mb3J0YWdlLm5ldCIsImdpdmVuX25hbWUiOiJMIiwiZmFtaWx5X25hbWUiOiJBIiwiZW1haWwiOiJsYUBjb21mb3J0YWdlLm5ldCJ9.k1SE-gBG7Xj01XJ1yOBcSvBkxhlU64EJUuXakJ0qO-rOrxkXvt2OvcR7eM4i3pkur2jrw3_Ld_4AgL4Udfn7FG_F0QRbpX5z8dEB7082LGKhOuPMn6tTGuDw9LpQE3CED2DPtofg8uJ_n3Gfeyeaa5i3Us_w3u0vsZNyh3XhiKmueSPuf2ijRUKzotfPjQ761SHYMSH0Dc2nbHRctruNiJd13_YkasmhiE0j4HJ7JneaNhOeQhGL63KpDaWRQv7Ab73HGZWpq15DzTDgwTFN7S-zXsH2LwNYVo6ITL9NCdN7eR2mrsAbYuybjFKlnwrLniBIPbaN2gBC_CbdyggnJA
The output will be a JWT token, structured into three parts:
- Header: Contains metadata such as algorithm type (e.g., RS256).
- Payload: Holds user claims, roles, expiration time, etc.
- Signature: Ensures token integrity using Keycloak’s realm RSA public key.
2. Retrieving the Keycloak Realm RSA Public Key
To verify the access token signature, we need the public key from the Keycloak authentication server. You can retrieve it with:
sh
curl -v https://localhost:8080/auth/realms/master/protocol/openid-connect/certs | jq
This will return a JSON response containing the realm’s public key (example):
json
{
"keys": [
{
"kid": "XBcXH2PlwhxXWyyFvdmvxYxeH96pB_4dfcSuYAaTBOI",
"kty": "RSA",
"alg": "RS256",
"use": "sig",
"n": "...",  // The modulus of the RSA key
"e": "AQAB"
}
]
}
This key is essential for validating the JWT’s signature.
3. Converting the Public Key to PEM Format
To use this key for verification, extract the x5c certificate value and format it into a PEM file:
-----BEGIN CERTIFICATE-----
MIICmzCCAYMCBgFrQiMxODANBgkqhkiG9w0BAQsFADARMQ8wDQYDVQQDDAZtYXN0...
-----END CERTIFICATE-----
This PEM certificate can now be used in JWT signature verification.
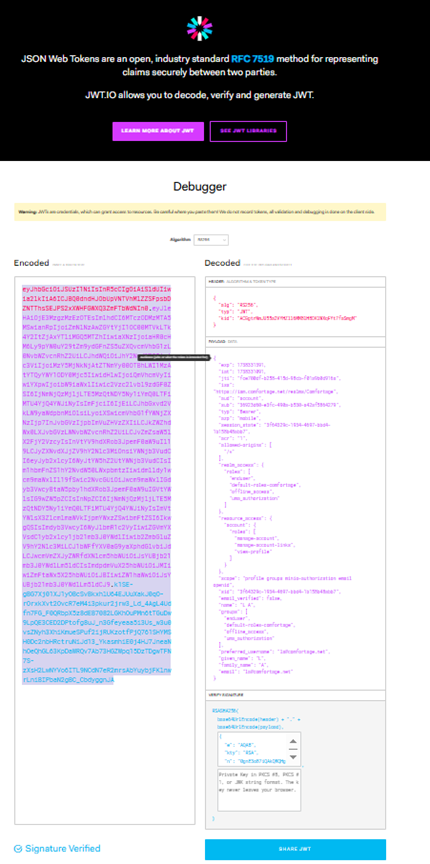
4. Verifying the Access Token Using JWT.io
With the access token and realm public key in place, we can now verify its authenticity.
Step 1: Copy the Token into JWT.io
- Open io
- Paste the access token into the Encoded JWT
- You should see the token’s decoded header and payload.
Step 2: Validate Token Fields
- Ensure “iss” (issuer) matches the Keycloak URL.
- Check “exp” (expiration time) to ensure it’s still valid.
- Verify user roles and claims.
Step 3: Validate Signature
- Copy and paste the PEM public key into the Public Key
- If the token is valid, io will confirm it.
- If invalid, you will see an error indicating a signature mismatch.
Conclusion
Validating access tokens ensures that only trusted requests reach your backend services. By leveraging Keycloak’s RSA public key, you can verify token signatures and strengthen authentication mechanisms in your application.
At Ropardo, we specialize in custom software development, integrating secure authentication and authorization solutions for modern applications. Whether you’re working with OAuth 2.0, OpenID Connect, or Keycloak, we provide expertise to implement scalable and secure identity management in your software solutions.
💡 Need help with Keycloak integration or authentication strategies? Get in touch with our team at Ropardo.