In this article we introduce our hands-on experiment with universaAAL platform within NESTORE project.
NESTORE proposes to support healthy older people to sustain their wellbeing and capacity to live independently by promoting customized pathway to wellbeing. Technically speaking, NESTORE’s ambitious objective is to develop an innovative, multi-dimensional, cross-disciplinary and personalized coaching system that, leveraging ICT social connectivity, will support older adults by encouraging them to become co-producers of their wellness.
universAAL is the result of several European research projects focused on creating an open platform and standards which will make it technically feasible and economically viable to develop Ambient Assisted Living solutions.
Looking at NESTORE as a platform, we aim to offer an open system that re-uses and integrates capabilities such as those provided by universAAL.
For our experiment, we used hardware and the universAAL platform blended with Ropardo software engineering expertise.
Hardware View
Hardware configuration was chosen to be representative for a home automation scenario. There is a gateway (home automation hub) device coordinating the IoT nodes from the location. Communication between the hub and the nodes is done over a private WiFi network (not shared/used by any other devices). External communication is done through an Ethernet link (wired).
The hub is run on an embedded ARM Linux SBC (Single Board Computer) with Allwinner A20 dual-core CPU.
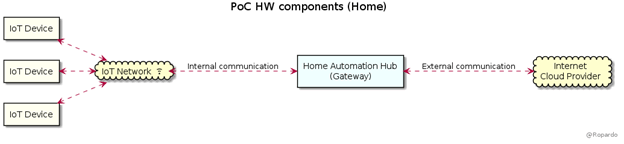
Both the hub and IoT node are open source hardware which can configured and modified for specific needs (no hardware modifications for the proof of concept).
The automation hub hardware configuration includes:
- Allwinner A20 dual core Cortex A7 CPU – 1GHz
- 1 GB DDR3 RAM
- 1 GBit Ethernet
- Native SATA support
- LiPo battery backup
- MicroSD card connector
- 5V DC
The IoT node uses ESP8266 (low cost, low power, wifi 2.4GHz) :
- ESP8266EX
- 2MB SPI Flash memory
- 5V DC
Software View
The automation hub runs a Linux distribution for ARM SBCs (Armbian Jessie based on standard Debian 8). Beside the latest Debian 8 packages we installed the dependencies for universAAL and IoT packages:
- Java 1.8.162
- Apache Karaf 3.0.8
- Mosquitto
- Python 3.5.5
For the IoT node we used the Arduino core for ESP8266 together with a couple of Arduino sketches for temperature sensor:
- OneWire
- DallasWireless
Development View
The configuration used for development and implementation the Proof-of-Concept includes a mix of older and newer Java versions. We tried to use the newest working version while doing minimal changes to universAAL packages. We succeeded in having a functional self-compiled environment by using:
- Java 1.8.0_162
- Java 1.7.0_80
- Eclipse Indigo SR 2 with uAAL Studio plugin
- Karaf 3.0.8
- Nexus 3
- Maven 3.5.2
- Arduino IDE
Java 1.8 was used for running Karaf and compiling universAAL middleware (keeping compatibility with Java 1.5). Java 1.7 was used for running Eclipse Indigo together with the uAAL Studio plugin.
Karaf 3.0.8 (the oldest still maintained Karaf version) was used instead of 2.x used in universAAL due to dependencies needed for PoC (API) – too old and buggy/not working in 2.x. We tried to use Karaf 4 but failed during deployment of universAAL (most likely additional changes are needed in middleware code to make it perform flawlessly on newer OSGi containers – but we did not deeply investigate the root cause of the problems).
UAAL Set Up
We followed these development environment setup instructions and build instructions.
The universAAL repository did not have the latest builds for all components. Some modules were at 3.4.2_SNAPSHOT, some of them were at 3.4.1. This resulted in impossibility to run the samples (versions not found) and the decision to have an independent repository.
The middleware was built from sources in order to have an NESTORE Nexus repository for the latest code level (3.4.2_SNAPSHOT).
Build was not working out of the box and we had to disable unit-testing (at least one-unit test failed so we skipped them to get a minimal working version compiled). The entire process of building and publishing the artefacts takes quite a long time and this can be seen as a potential issue if code changes are needed in the platform (for whatever reason).
Once the internal repository was populated the tested samples worked fine (after adjusting the source repo, maven configuration etc., but this is just standard java development patterns).
Setup of the Eclipse plugin encountered no issues, but its usage is kind of limited. The generated code does not follow the latest changes in the middleware (rename of the classes) and running of the Run Config seems to be no longer supported (February 2018).
This resulted in the need to manually modify the code templates and to run the modules directly in Karaf. For pure Java development we don’t see the need to use the plugin. No assessment was done for ontology development and its specific needs.
Results
We use a similar approach with uAAL structure (multi-module maven project) and the Eclipse project structure contains:
- hvac.pom – used for tracks common libraries versions (uAAL platform)
- hvac.shared – allow common code to be reused through the other modules
- hvac.driver.temperature – represents uAAL driver for temperature sensor
- hvac.driver.relay – represents uAAL driver for relay (actuator)
- hvac.reasoner – represents decision making code for actuator activation based on temperature input
- hvac.api – REST/JSON api for observing the system status and configuring various parameters
The modules presented above were generated with uAAL wizard but required changes to work with latest uAAL platform. They follow a common structure (they’re OSGi bundles) so it would be straight forward to create a template bundle and then just reuse/duplicate it for something specific (without the need to use/update from studio wizard).
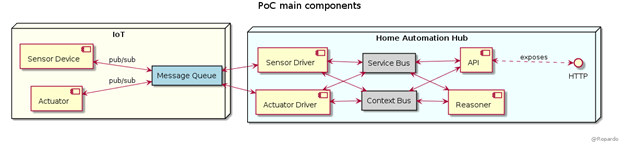
Figure 6 illustrates the components setup and usage for the IoT domain and for the home automation hub domain. The IoT consists in the sensor device (temperature sensor) and actuator (relay) whose code runs on the IoT node.
The communication of sensor data and actuator commands/status is done using a message queue (implemented with mosquito running on the linux node). The message queue is checked (subscribed) by the sensor and actuator drivers. The sensor and actuator have separate drivers implemented as universAAL/OSGi bundles. Each driver subscribes to specific topics on the message queue and generate events on the context bus in the universAAL environment. Both drivers expose services on the service bus to receive commands (sensor driver has setup commands, actuator driver has on/off commands for the relay).
In addition to the drivers the hub runs the reasoner and API. The reasoner listens for temperature events on the context bus and decides to switch the relay on or off in order to keep the temperature in a narrow band. The API module listens for temperature and relay events and keeps a status of the system that can be publish over HTTP to an external client (uses standard REST/JSON interface).

A typical closed-loop (feedback) automation sequence is detailed in Figure 3:
- temperature sensor publishes its value into message queue on a topic dedicated to the sensor (uses its hardware ID) (step 1)
- sensor driver sees the temperature value (it’s subscribed to the sensor’s topic), reads it (step 2) and publish an universAAL event on the context bus (step 3)
- the reasoner is subscribed to context bus and receives the new temperature value (step 4)
- if the value is outside the temperature range to be kept then it decides to change the actuator state (on or off depending on the current state and temperature value); for this it calls a service using the service bus (step 5)
- The actuator driver is invoked for the request (step 6) and publish the actual command on the IoT message queue (step 7)
- The IoT actuator receive the command (it’s subscribed to the message queue) (step 8), execute it and generates and event with the actual state of the physical actuator (in the eventuality the command was rejected by the actuator) (step 9)
- The actuator driver received the actual status of the actuator (step 10) and publish an event on the context bus (step 11)
- The event is received by the reasoner (step 12) which will update its internal model (and will use the new state during the next temperature read/event).
Each uAAL bundle has a similar code structure:
- Each bundle has an Activator (required by OSGi specification) that setup/tear-down the bundle
- Events are received / emitted from context bus using a Publisher/Subscriber mode (based on ontology definition)
- Services are offered by registering Service Profiles (describe what’s offered)
- Services are full filled on service call requests
- Services are invoked filling in a Service Request
- Parameters can be Java primitives or uAAL ontology entities (Derived from Resource)
- Any other Java library can be used (if it needs UI, like AWT/Swing/SWT then the Karaf container must run on a platform supporting the required UI – i.e. no embedded deployment).
The API module is used to provide a standard interface (REST/JSON over HTTP) to the internals of the universAAL system. It allows the query (GET) and update (PUT) of various values:
- GET / – retrieves JSON with full system status
- GET /temperature/current – retrieves the current temperature
- GET /temperature/target – retrieves the target temperature set in the system
- GET /temperature/threshold – retrieves the temperature threshold for starting/stopping the relay
- GET /temperature/delay – retrieves the delay between readings
- GET /status – retrieves the status of the system (if it is enabled or disabled)
- GET /relay – retrieves the status of the relay (if it’s on or off)
- PUT /temperature/target – Modifies the target temperature with 1 degree (+ or -)
- PUT /temperature/threshold – Modifies the threshold using 0.1 degree steps (+ or -)
- PUT /temperature/delay – Modifies the delay between reads in 1second steps (+ / -). When the delay is 0 the sensor is disabled (won’t send any more temperature reads).
- PUT /status – Enable or disable the overall system status (when disabled no reasoning is performed)
- PUT /relay – Sets the relay status
Challenges
The implementation of our PoC using the uAAL outlines that for this kind of work one needs above-average resources able to handle complex environment of universAAL for all life-cycles: setup, development, deployment, maintenance. The platform could not be approached as just another Java library or solution because it required compilation from sources, script changes to be able to run on newer software components, looking through code to pinpoint what went wrong or was used incorrectly, nexus setup for using it etc. (with a common java library or platform one gets the binary, read the documentation or samples, setup some maven links and generate/compiles the project using it).
During the development process there were random Karaf (uAAL) crashes happening after several bundle deployments without no overall restart. This indicates our uAAL setup is unstable for complex development.
The runtime performance on embedded devices (likely to be used as automation hubs) was poor during startups: the Karaf with uAAL deployed into it took between 90 and 120 seconds for the startup, as comparison, the Karaf container without uAAL only took 10-20 seconds. This can be an issue for real-life usage where the users expect fast startup (couple of seconds) after power on (and it adds the need for a feedback mechanism to the users, to make them aware of the current device status – crashed, powering up, running…).
Conclusions
The main objective of the activities reported in this article was to learn and understand universAAL platform and the way it can support NESTORE architecture development. Some key points have been found relevant to understand the involvement of such platform.