There are many examples of how you could use a ComboBox as a RadGrid filter but if you would like to use check boxes inside that ComboBox you’ve got your work cut out for you. This article is going to make you life easier and give you an example of how you could achieve that.
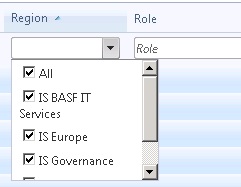
The ComboBox filter described in this article could look like this :
Achieving this kind of behavior is rather complicated and I will try to keep it as simple as I can.
First of all, in the RadGrid Columns collection you have to add the following code :
<telerik:GridTemplateColumn UniqueName="ResourceType" DataField="Resource_type" HeaderText="Resource Type" FilterControlWidth="40%" SortExpression="Resource_type"> <FilterTemplate> <telerik:RadComboBox ID="resourceTypeFilterCombo" runat="server" Width="100%" AutoPostBack="true" Sort="Ascending" SortCaseSensitive="false" Height="120px" OnClientDropDownClosing="ApplyGridFilter" AllowCustomText="true" OnTextChanged="FilterResourceType" EmptyMessage="Resource Type" DropDownWidth="150px" /> </FilterTemplate> <ItemTemplate> <asp:Label ID="lblResType" runat="server" Text='lt;%# Eval("Resource_type")%>'> </asp:Label> </ItemTemplate> </telerik:GridTemplateColumn> |
As you can see, we are using a GridTemplateColumn to define the column from the RadGrid.
We have to specify the FilterItemTemplate and the ItemTemplate. The ItemTemplate is just a label displaying the value of the bounded data field.
The FilterItemTemplate contains the ComboBox that will be populated with the values available in the grid. The combo box must be allowed to PostBack automatically and you can see there is a client side function called “ApplyGridFilter” and a server side method”FilterResourceType” that will be called when the text of the combo box has changed. This server side method will do the actual filtering of the grid . The client side function will trigger the TextChanged event of the combo box and it looks like this:
function ApplyGridFilter(sender,args) { sender.raise_textChange(sender,args); } |
Before we continue with the client side selection handling, we have to see how this combo box is created and binded to the data source. This process takes place inside the grid ItemDataBound event . Because binding the combo box has nothing special added, it was omitted from the code and I will only describe how the combo box is created.
//binding the filter if (e.Item.ItemType == GridItemType.FilteringItem) { RadComboBox resourceTypeFilterCombo = (RadComboBox)e.Item.FindControl("resourceTypeFilterCombo"); resourceTypeFilterCombo.Attributes["serverID"] = "resourceTypeFilterCombo"; resourceTypeFilterCombo.ItemTemplate = new FilterItemTemplate(); } |
As you can see from the code above, we get a refference to the combo box we want to bind and we add a custom attribute called serverId that will be used later. The interesting part is when we assign an FilterItemTemplate object as the combo box ItemTemplate.
The FilterItemTemplate class extends ITemplate and defines the way an item from the combo box looks like. We are using this class because the usual, much simpler, approach that describes the ItemTemplate in the aspx page doesn’t allow us to bind the combo box to the values from the grid.
To extend ITemplate you must override the InstantiateIn method, besides that, you can add any kind of functionality you need. In our case we just added an event handler for the binding of the control. During the data binding of this control we also add an ‘onClick’ attribute that will handle the chec box selection client side.
Here is the code for the FIlterItemTemplate class :
public class FilterItemTemplate : ITemplate { public FilterItemTemplate() { } public void InstantiateIn(Control container) { PlaceHolder ph = new PlaceHolder(); CheckBox checkBox = new CheckBox(); checkBox.ID = "checkBox"; ph.Controls.Add(checkBox); ph.DataBinding += new EventHandler(ph_DataBinding); container.Controls.Add(ph); } protected void ph_DataBinding(object sender, System.EventArgs e) { PlaceHolder ph = (PlaceHolder)sender; RadComboBoxItem ri = (RadComboBoxItem)ph.NamingContainer; CheckBox theCheckBox = ((CheckBox)ph.FindControl("checkBox")); theCheckBox.Text = ri.DataItem.ToString(); string checkBoxScript = BuildCheckBoxScript(theCheckBox, ph); theCheckBox.Attributes.Add("onclick", checkBoxScript); } private string BuildCheckBoxScript(CheckBox chk, PlaceHolder ph) { StringBuilder sb = new StringBuilder(); sb.Append("GridFilterCheckboxClick('"); sb.Append(ph.Parent.Parent.ClientID); sb.Append("','"); sb.Append(ph.Parent.Parent.ID); sb.Append("','"); sb.Append(chk.ClientID); sb.Append("');"); return sb.ToString(); } } |
If you look at the BuildCheckBoxScript method from this class you see that we call a javascript function called GridFilterCheckboxClick. This Javascript function takes in 3 parameters that will be used to process the click event.
These parameters are : the client and server id of the combo box that contains the check box and the client ID of the check box.
Now we can go back to the client side and see how selection is handled on the multi-select combo box from the filter.
When an item from the combo box is selected the GridFilterCheckBoxClick function gets fired as defined in the FIlterItemTemplate class.
function GridFilterCheckboxClick(comboClientId, comboServerId, chkClientID) { var combo = $find(comboClientId); var filterInput=GetFilterInput(comboServerId); UpdateFilter(combo,filterInput, document.getElementById(chkClientID)); } |
The code above can be used by multiple filters and is responsible with updating the filter values. First of all we get a reference to the combo box using the combo box’s client ID received as a parameter.
To be able to store all the selected values, and persist them over post-backs we need to use some hidden input fields(one for each filter). In the code above, ‘filterInput’ is a reference to a hidden field obtained calling ‘GettingFilterInput’ and passing the name of the combo box (this is the server ID). This function (GettingFilterInput) returns a different input field depending on the received parameter (it has been omitted because it’s pretty much straightforward ).
The UpdateFilter function processes the filter change. It gets all the selected items from the combo box and builds a string with the values of the items separated by a comma. After this is done you have to store the generated string in the hidden field input. In my case I had to do more complex processing so I omitted the code because the base line is simple enough that you can figure on your own.
So this is it. You successfully added a combo box with multiple select inside a RadGrid filter.
When you select an item from the combo box, a string containing all the selected values is stored in a hidden input. When the combo box drop down closes it automatically triggers a ‘TextChanged’ event that will do a post back and allow you to filter the grid.
We said at the beginning of the article that for each of these filters we need to have a unique handler for the TextChanged event.
Having a unique handler we can determine server side what filter we need to apply . To get the data from the hidden input filed you could do something like this :
public void FilterResourceType(object sender, EventArgs e) { GridColumn activeColumn = this.resourceGrid.Columns[11]; string filterVal = this.hidResourceTypeFilter.Value.ToString(); RadComboBox comboBox = sender as RadComboBox; // grid filter logic goes here } |
I hope the article is not to hard to follow and that you can find use of this information.
Finally, there’s another very important peculiarity of what does Cialis that brings it so high above its alternatives. It is the only med that is available in two versions – one intended for use on as-needed basis and one intended for daily use. As you might know, Viagra and Levitra only come in the latter of these two forms and should be consumed shortly before expected sexual activity to ensure best effect. Daily Cialis, in its turn, contains low doses of Tadalafil, which allows to build its concentration up in your system gradually over time and maintain it on acceptable levels, which, consequently, makes it possible for you to enjoy sex at any moment without having to time it.
Can you provide a full example of the code please?
July 25, 2011 at 7:06 pmHi Brian,
All the relevant code is posted already, the portions of code I have omitted where relevant to the behavior I needed.
I will be glad to help you figure this out (you just have to tell me where you’re stuck).
Thanks for reading,
July 28, 2011 at 8:47 amStelian Morariu
Well all of it actually. The UpdateFilterFunction, the actual grid filter function, how do you set the CurrentFilterValue with multiple values when it only accepts one? The parts in your paragraphs where you say its self explanatory. To me it’s not =) A working example say off the northwind db would be GREAT. lol
August 4, 2011 at 6:12 pmPlease can you publish or provide a working example or the full code?
October 4, 2012 at 9:59 pmThanks!!