Hello!
In this tutorial I will tell you how to install and configure Liferay 6.2 with Eclipse.
Downloads
Before we begin, you will need a few things:
-
Go to the Liferay website and access the Downloads page.
(http://www.liferay.com/downloads/liferay-portal/available-releases)
From here you will need the following:
-
Liferay bundled with Tomcat (the first option)
-
The last item in the dropdown list is Plugins SDK. Download this as well. You will need it in case you choose to create a liferay project using Ant.
-
Next go to https://www.eclipse.org/downloads/ and get the latest Eclipse IDE version (the current one is Eclipse Mars)
-
You’ll be needing some DB management as well (by default Liferay uses it’s own DB system… but why use that when you can do with something better?). For this purpose you’ll have to download PostgreSQL (http://www.postgresql.org/download/)
-
You will also need to download a few dependencies:
-
Java Development Kit (JDK)
http://www.oracle.com/technetwork/java/javase/downloads/index.html
-
Apache Maven (even though it’s not the latest version, please download maven 3.0.5, as this is a tested stable version for Liferay 6.2). At the following link download apache-maven-3.0.5-bin.zip :
http://archive.apache.org/dist/maven/maven-3/3.0.5/binaries/
-
Apache Ant (latest version will do; no problems with this one).
http://ant.apache.org/bindownload.cgi
(FYI: The download link is somewhere at the middle of the page, under the red stuff… apache-ant-1.9.6-bin.zip – this is the current version and what you are supposed to download)
-
And last but not least, for those of you who wish to play with Maven, go ahead and download the latest version for Maven Artifacts (liferay-portal-maven-6.2-ce-ga4 is the latest one. Look it up in the list at the link below.)
http://sourceforge.net/projects/lportal/files/Liferay%20Portal/6.2.3%20GA4/
Installation
Let’s start with the dependencies:
-
Java Development Kit
-
On your C:\ drive create a folder called Java. Install JDK in this folder.
-
Next, in your machine navigate like this:
Control Panel System Advanced system settings Environment Variables
-
At the bottom half of the panel you will have System variables. Create a new variable.
Variable name: JAVA_HOME
Variable value: C:\Java\jdk1.8.0_60
(or whatever the name of the jdk folder is – depends on the latest version you downloaded)
-
Click OK. Then in the same list search for the variable called PATH. Select it and click edit. In the value field you will see a rather long string of stuff. DO NOT DELETE ANYTHING IN IT! At the end of the line after a semicolon (if the semicolon doesn’t exist then add one), write the following:
%JAVA_HOME%\bin;
(By doing this, you pointed at the JAVA_HOME variable you just created – this one is written between % symbols – and then told it to look in the bin directory where all the good stuff are)
-
Click OK and you are done with JDK setup.
-
To verify if everything works, open your console and type:
java –version
-
If you get a message similar to the following, then everything works:
java version “1.8.0_60”
Java(TM) SE Runtime Environment (build 1.8.0_60-b27)
Java HotSpot(TM) 64-Bit Server VM (build 25.60-b23, mixed mode)
-
Apache MAVEN & Apache ANT
-
For Maven and Ant is exactly the same drill as above. Create a folder for each of them in your C:\ drive (I recommend using their names – Maven for maven, Ant for ant – to keep a clean track of everything)
-
Then simply create a variable for each:
Variable name: MAVEN_HOME
Variable value: C:\Maven\apache-maven-3.0.5
Variable name: ANT_HOME
Variable value: C:\Ant\apache-ant-1.9.6
(or whatever the name of the ant folder is – depends on the latest version you downloaded)
-
Next, add them in the PATH variable the same way you did with JAVA_HOME, and that’s about it.
-
Verify MAVEN:
mvn –-v (or mvn –version)
-
If you get something similar to the following result, then everything is working fine:
Apache Maven 3.0.5 (…)
Maven home: C:\Maven\apache-maven-3.0.5\bin\..
Java version: 1.8.0_60, vendor: Oracle Corporation
Java home: C:\Java\jdk1.8.0_60\jre
Default locale: en_US
OS name: “X”, version: “X”
-
Verify ANT:
ant –version
-
If you get something similar to the following result, then everything is working fine:
Apache Ant(TM) version 1.9.6 compiled on June 29 2015
-
Maven Artifacts
-
Extract the liferay-portal-maven-6.2-ce-ga4 archive somewhere (doesn’t really matter where)
-
Enter the folder you just extracted, access the console in the folder (for Windows is SHIFT + right click Open command window here) and type:
ant install
-
It will take a while for everything to install. When it’s finished, in the console you will get a message saying BUILD SUCCESSFUL (or something like that). Close the console.
-
You will need this if you decide to create a Liferay Theme using Maven.
Now it’s time to install the big stuff:
-
Go ahead and start by installing PostgreSQL. You will also have to choose a password (for the sake of this tutorial, let it be 123456). The default username is postgres.
-
Open pgAdmin III. Under servers you will have something simillar to PostgreSQL 9.4 (localhost:…). Double click it and a prompt message will appear asking you to login. Type in your password and click OK.

-
Once successfully logged, right click on Databases and create a new DB. Let’s call it test.
-
You are done with postgre (for now).
-
Next, you’ll have to choose a place in your machine where you want to put Liferay.
-
Create a folder called Liferay (or whatever name you desire for your portal project). In this folder you’ll have to extract the following archives:
-
liferay-portal-tomcat-6.2 (rename the folder from this archive to liferay-6.2 – it’s easier to use)
-
liferay-plugins-sdk-6.2
-
Inside the newly extracted (and renamed) liferay-6.2 folder, navigate like this: tomcat-7.0.42 bin startup.bat
(the console will open and will start running stuff. It will take a while.)
-
At some point, your browser will open the Liferay – Basic configuration – page (see below):
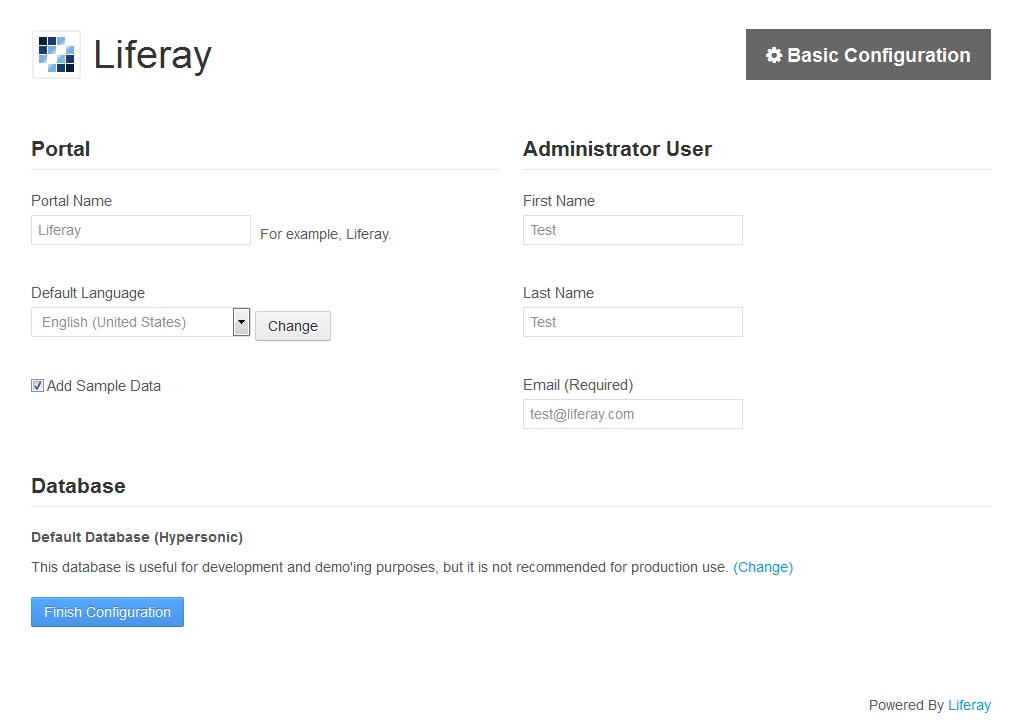
-
Fill in all those fields (Portal name, First name, etc etc) – remember the e-mail you choose, as you will need it to log in.
-
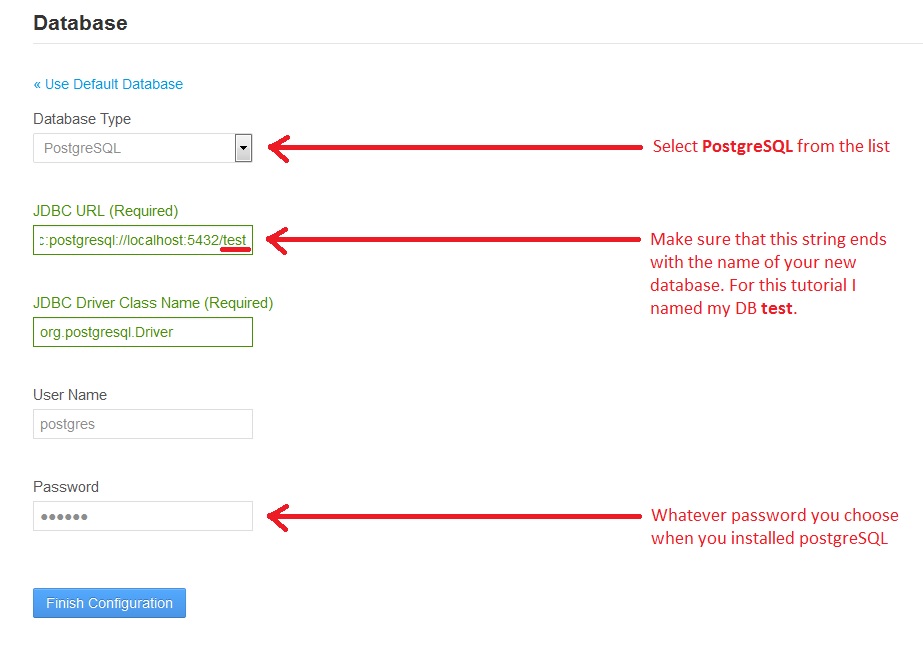
Before you click Finish, first you have to link your new Liferay Portal to the postgres DB you created earlier. For this, click on the button (Change) and fill in the required fields. See the image below:
-
You will wait a while for this:
![]()
-
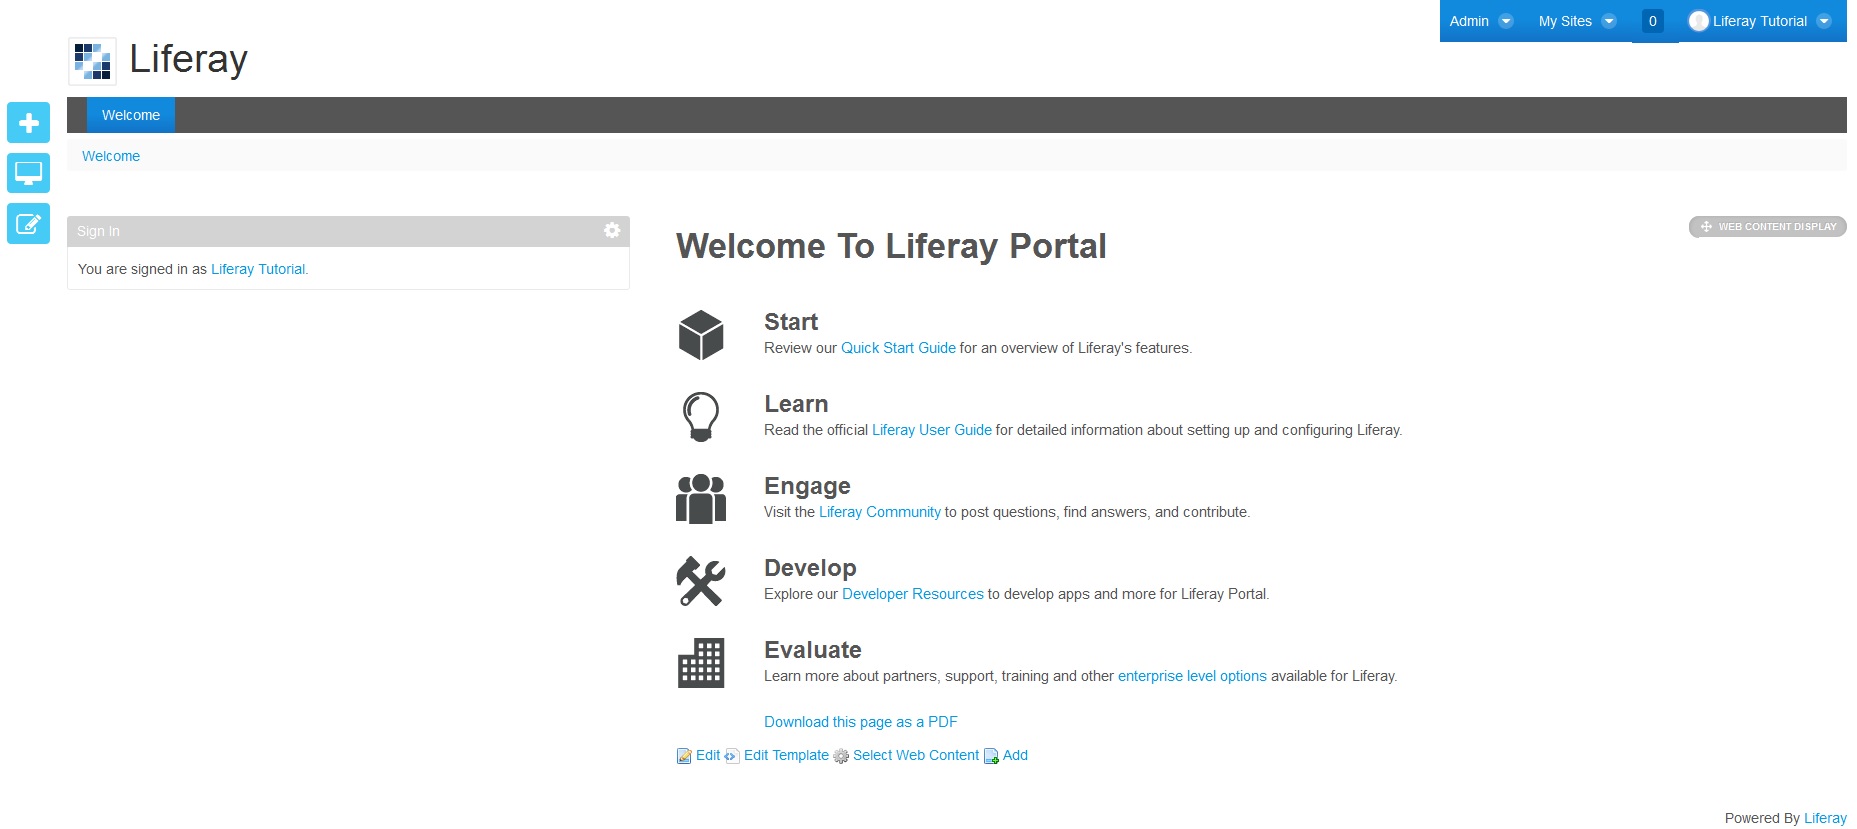
If everything works the way it should, you will get something similar to this (Congrats!):
![]()
( As you can see… in the D: drive I create a folder called Liferay – where I keep all my Liferay portals. Inside this folder I added the current tutorial portal called ArticleLiferay, and inside it – as said above in this tutorial – I have the extracted archive renamed as liferay-6.2. It’s best practice to keep it all clean and organized.)
– Since we’re still here and you are probably wondering what that portal-setup-wizard file is, I might as well just tell you. If you open it, you will see a short list of details about your recently configured portal (including some details regarding the admin account you created and DB credentials)
– Also at the end of that list you will notice something like this:
setup.wizard.enabled=false
– If you change the false value into true and refresh your liferay page, the configuration progress will start all over again. And once it’s finished, that value will be automatically set to false again by Liferay.
– Go ahead and click Go to My Portal button. First you will be redirected to the Terms of use page (just scroll to the bottom and Agree… it\s not like you were going to read all that anyway, right?). In the next step, Liferay will ask you to choose a password for your admin account (I recommend using something you can remember – it’s rather annoying to retrieve it if you forget it, because the mail system is not functional in a new portal – or you can always reset the config process as I told you above)
– After you’re done with the config, the default page will look like this:
– Close the console opened by startup.bat . We’ll open the server with Eclipse from now on.
Time to configure Eclipse!
– Find a suitable place on your machine and extract the eclipse-java-mars-R-win32-x86_64.zip archive (or whatever yours is called)
– Once this is done, navigate inside the folder and open eclipse.exe . You will be asked to setup a workspace. Do that and also make it remember your decision so you won’t have to do it every time you open it.
– Now you need to install Liferay IDE into eclipse. For this task you need to open
Help Install New software…
– In the window that opens, in the Work with field, copy-paste the following link:
http://releases.liferay.com/tools/ide/latest/milestone/
– It will automatically load some contents and prepare them for installation. Select them all and complete the process
– If you don’t have the Console and Servers tabs displayed (and by default you probably won’t), navigate like this: Window Show view click on Console. For Servers you might have to go to Other… and search by keyword Server; select it and click OK. (For a better view of both these tabs, I suggest you drag the Server in the left column). The final result will look like this:

– Next go to Window Preferences Liferay Installed Plugin SDK Add…
– A window for New Liferay Plugin SDK will open. For the Location field: browse your files for the liferay-plugins-sdk-6.2 folder you extracted when first started the Liferay installation. The Name field will fill automatically. It should look like this:
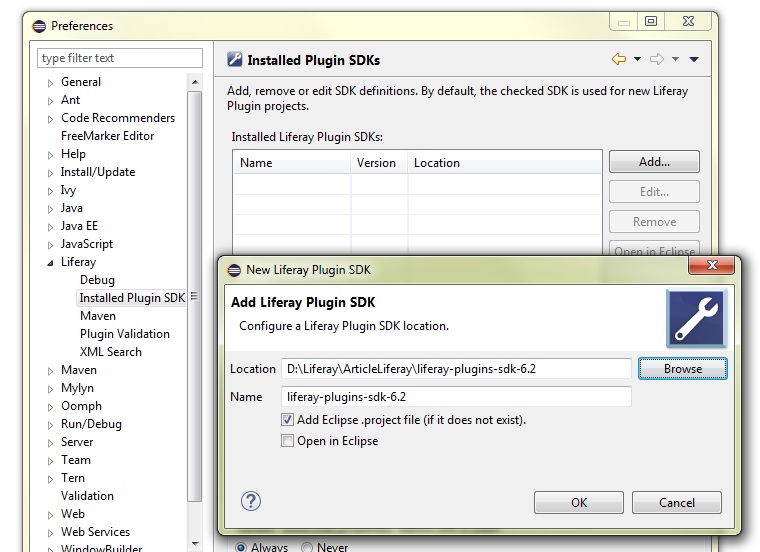
– click OK.
– next, also in Preferences, go to Server Runtime Environments Add
– A window will open. In the list, search for the folder Liferay, Inc. and select Liferay v6.2 CE (Tomcat 7). See the image below:

– on the next window you will have to Browse… for the tomcat folder found in the Portal liferay-6.2 folder ( liferay-6.2 tomcat-7.0.42 ). It will look like this:
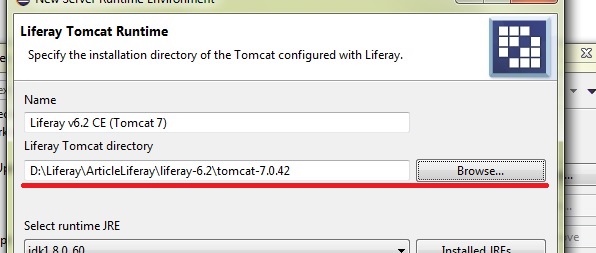
– click FINISH, then OK.
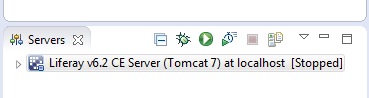
– Next, in the Servers tab you have the following message:
No servers are available. Click this link to create a new server…
– Click it! Search for directory Liferay, Inc. and select Liferay v6.2 CE Server (Tomcat 7) from the list. Click Finish! Now the Servers tab will look like this:
– Time to start the server. Select the server and either click on the green play icon above it or:
right click on the server Start
– You will see a lot of stuff popping up in the Console. When the server is Started, you will get something similar to the following message (Until then, just sit tight and wait.):
INFO: Server startup in 63288 ms
– The Liferay Portal will also open in your browser (The same way it did when you first opened startup.bat)
– When you finish working with Liferay, remember to shut down the Tomcat server before closing Eclipse. Either click on the Stop the server button (the red square) or same as above: right click on the Tomcat 7 server Stop
Congratulations! If all the steps were followed and the result is the same as described in the lines above, then you successfully installed & configured Liferay 6.2 !!
———————————————————————————————————————
Optional config:
– You will also need to activate Developer Mode for Liferay. This basically lets you work on your Liferay Projects and see the result in real time without having to deploy the project for every single change you make (kinda cool, right?)
– Navigate to the liferay-6.2 folder and create a file called portal-ext.properties (make sure you add the extension .properties)
– Inside this file, copy-paste the following code:
# Development settings
theme.images.fast.load=false
theme.css.fast.load=false
javascript.log.enabled=false
layout.template.cache.enabled=false
browser.launcher.url=
combo.check.timestamp=true
freemarker.engine.cache.storage=soft:1
freemarker.engine.modification.check.interval=0
openoffice.cache.enabled=false
velocity.engine.resource.manager.cache.enabled=false
com.liferay.portal.servlet.filters.cache.CacheFilter=false
com.liferay.portal.servlet.filters.themepreview.ThemePreviewFilter=true
user.timezone=Europe/Bucharest
com.liferay.portal.servlet.filters.minifier.MinifierFilter=false
com.liferay.portal.servlet.filters.strip.StripFilter=false
journal.template.velocity.restricted.variables=
journal.article.force.autogenerate.id=false
– You can read more about this on the Liferay website: